 |
| New tile-set art for Squirrel Away! |
tl;dr: I created new tile art for Squirrel Away, and I explored tile-set design trade-offs.
What happened last week?
I created a new tile-set for Squirrel Away.
I've learned a lot about about creating tile-sets—and about creating art in general—since I originally created my tile-set for Squirrel Away, and now is finally the time for me to re-draw it!
I have a few additional goals as part of this process:
- I want to have a really polished tile-set template that I can re-use for all my future tile-sets.
- I want to have a well-documented approach for how I approach creating tile-sets, so that I don't waste as much time on future tile-sets.
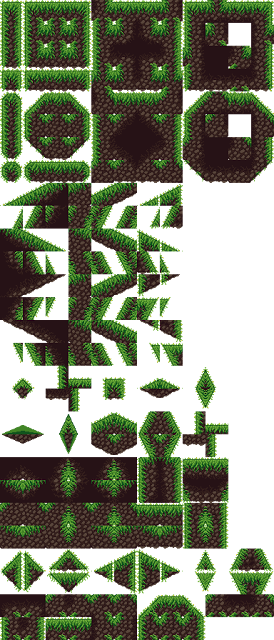
Creating a tile-set is a pretty time-consuming and tricky process:
- I need to draw a cell for each surface slope that I support.
- And I need to draw a cell for many of the possible transitions from one slope to the next.
- I support slopes at 90°, 45°, and 26.57° (1-up-2-over), so there are a lot of slope combinations!
- I need to decide how many layers of stuff to draw for a surface.
- For example, I have a layer of foliage on the edge, and a layer of rocks below it.
- I need to decide whether I want the art to fade to a solid color for interior cells.
- And this lets me give higher contrast to the actual interactable surface boundaries, while de-emphasizing the less-important interiors.
- And this makes levels look a lot better in general.
- I need to decide whether I want the art to extend slightly past the collision boundary of the cell.
- This makes things look more natural, and makes it look more like the character is walking on the ground rather than above it, since there can be things like grass behind the character's feet
- But this makes the transitions between slopes more difficult to design.
- I need to decide how deep I want to draw the surface art before fading.
- Deeper art looks better.
- But deeper art means you have more difficult transitions to address between different slopes.
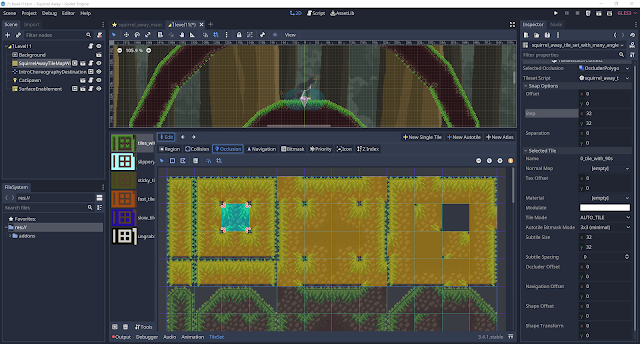
- I need to decide how I want to structure my tile-set so that it works best within Godot's auto-tiling system.
- Auto-tiles make it a lot easier to create levels!
- I need to configure cell should be drawn depending on which of the neighboring cells is populated.
- But once I do that, I can "paint" across Godot's scene editor, and Godot will automatically draw the appropriate art for each cell.
- However, when I start adding angles beyond 90°, Godot's auto-tile system isn't clever enough to know which option to use, since there can be multiple possible tile-set cells that all attach to neighbors in the same directions.
- I could completely re-implement auto-tiling with my own custom logic that would probably work for most cases, but that would also be a lot of work, and might not be as future-proof.
- This means that there will be some amount of manual tile placement after drawing most of the level with auto-tiling.
 |
|
 |
|
 |
|
 |
|
What's next?
- I think I'll spend most of this next week also working on tile-sets.
- My latest tile-set relies on a lot of careful art-manipulation along cell borders to help make sure that things transition smoothly across different angles from the same cell.
- This means that some surfaces have a more-shallow layer of art than others.
- And this means that there is often an odd-seeming waviness in the art.
- I think a new approach, with separated tile-sets for the different angles as well as the different art-depth-layers, will be both easier to create, and render better-looking levels.
- I will also consider writing my own custom auto-tiling sub-tile-selection logic by overriding TileSet._forward_subtile_selection.
🎉 Cheers!
Comments
Post a Comment