| A jump trajectory. |
This is part 3 of 5 in a series describing how to implement 2D-platformer AI, pathfinding, and character movement. You can see a working example of these techniques in the Surfacer framework for Godot.
Part 3: Calculating jump trajectories
So far, we've learned about how we move the character in general, and how to parse a level into its constituent surfaces. All of this is fine and all, but the really interesting magic in our platformer AI is pre-calculating jump trajectories!
NOTE: I'll often refer to these jump trajectories as "edges", since we'll later be constructing a platform graph using positions-along-surfaces as "nodes" and these jump trajectories as "edges".
The Surfacer framework uses an algorithmic approach to calculate trajectories for movement between surfaces. The algorithms used rely heavily on the classic one-dimensional equations of motion for constant acceleration. These trajectories are calculated to match the same abilities and limitations that are exhibited by the corresponding player-controlled movement—that is, Surfacer's default set of action-handlers. After the trajectory for an edge is calculated, it is translated into a simple instruction start/end sequence that should reproduce the calculated trajectory. These instructions emulate what would be triggered by a human player with controller input.
Some trade-offs of this approach
Benefits
- Being able to use graph-traversal algorithms gives us a lot of control for making intelligent NPC behaviors.
- Otherwise, we might have to resort to naïve heuristics, like jumping in the intended direction and hoping that their will be a reachable surface.
- This emulates the same movement mechanics that a human player could produce.
- This means that we could do things like swap-in an AI for a co-op game, when the player doesn't have a friend to play with.
- This also lets us simplify many parts of our codebase, since player-controls and AI-controls can be treated the same way.
- This gives us more control, predictability, and editability than would be possible with a machine-learning approach.
Downsides
- Each edge in the level must be calculated ahead of time.
- And there can be quite a lot of edges in a level!
- For every pair of surfaces, we could calculate up to eight edges.
- Although, we ignore edge pairs that are too far apart.
- And most close-enough edge-pairs would only consider a couple potential edges.
- And, this means that we can't move platforms around or make changes to the level terrain at runtime!
- Although, we can at least get some of this flexibility back with a dynamic surface-exclusion list.
- Edges are expensive to compute.
- For each potential edge, Godot's move_and_collide collision API is called for each frame of the edge's proposed trajectory.
- This is compounded by the fact that each type of character might need to have different movement parameters (such as jump height and walk speed), and an additional platform graph must be calculated and stored for each different set of movement parameters.
- The platform graph can be quite large.
- This can take a lot of RAM to load at runtime, which can have an impact on performance on some devices or browsers.
- This is quite complex to implement!
The algorithm
Next let's dive into into the nitty gritty for how we can calculate edge trajectories.
tl;dr: The high-level steps
- For a given pair of surfaces, pick some "good" jump and land positions.
- Determine how high we need to jump in order to reach the destination.
- If the destination is out of reach (vertically or horizontally), ignore it.
- Calculate how long it will take for vertical motion to reach the destination from the origin.
- We will define the movement trajectory as a combination of two independent components: a "vertical step" and a "horizontal step".
- The vertical step is based primarily on on the jump duration calculated above.
- We call these "steps", since either step corresponds to the press and release of a controller input—i.e., move-sideways and jump.
- Calculate the horizontal step that would reach the destination displacement over the given duration.
- Check for any unexpected collisions in each frame of the trajectory represented by the vertical and horizontal steps.
- If there is an intermediate surface that the character would collide with, we need to try adjusting the jump trajectory to go around either side of the colliding surface.
- We call these points that movement must go through in order to avoid collisions "waypoints".
- Recursively check whether the jump is valid to and from either side of the colliding surface.
- If we can't reach the destination when moving around the colliding surface, then try backtracking and consider whether a higher jump height from the start would get us there.
- If there is no intermediate collision, then we can calculate the final edge movement instructions for playback based on the vertical and horizontal steps we've calculated.
Some important aspects
- We treat horizontal and vertical motion as independent to each other.
- This greatly simplifies our calculations.
- We calculate the necessary jump duration—and from that the vertical component of motion—up-front, and use this to determine timings for each potential step and waypoint of the motion.
- Knowing these timings up-front makes the horizontal min/max calculations easier.
- We have a broad-phase check to quickly eliminate possible surfaces that are obviously out of reach.
- This primarily looks at the horizontal and vertical distance from the origin to the destination.
Calculating "good" potential jump and land positions
 |
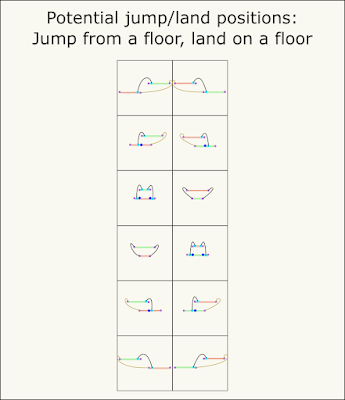
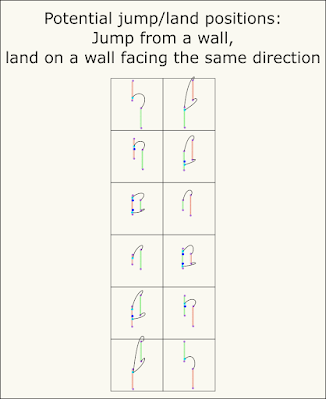
| Some "good" potential jump/land positions between two floor surfaces. |
Deciding which jump and land positions to base an edge calculation off of is non-trivial. We could just try calculating edges for a bunch of different jump/land positions for a given pair of surfaces. But edge calculations aren't cheap, and executing too many of them impacts performance. So it's important that we carefully choose "good" jump/land positions that have a relatively high likelihood of producing a valid and efficient edge.
Additionally, when jumping from a floor, we need to determine what initial horizontal velocity to use for the edge calculation (for wall jumps, Surfacer gives all jumps a constant horizontal and vertical start velocity). This horizontal start velocity can then influence the jump/land positions.
- Some interesting jump/land positions for a surface include the following:
- Either end of the surface.
- The closest position along the surface to either end of the other surface.
- This closest position, but with a slight offset to account for the width of the character.
- This closest position, but with an additional offset to account for horizontal or vertical displacement with minimum jump time and maximum horizontal velocity.
- This offset becomes important when considering jumps that start with max-speed horizontal velocity, which could otherwise overshoot the land position if we didn't account for the offset.
- The closest interior position along the surface to the closest interior position along the other surface.
- The position along a horizontal surface that is behind the overall connected region that the vertical land surface is a part of.
- This position is important if we need to consider movement around behind a wall that then lands on the top of the wall.
- We try to minimize the number of jump/land positions returned, since having more of these greatly increases the overall time to parse the platform graph.
- We usually consider surface-interior points before surface-end points (which usually puts shortest distances first).
- We also decide start velocity when we decide the jump/land positions.
- We only ever consider start velocities with zero or max speed.
- This simplification makes our calculations more manageable, but might lead to some inaccuracies.
- We can improve these start velocities with edge optimizations at run-time (more on that in the next post!).
- Additionally, we often quit early as soon as we've calculated the first valid edge for a given pair of surfaces.
- In order to decide whether to skip an edge calculation for a given jump/land position pair, we look at how far away it is from any other jump/land position pair that we already found a valid edge for, on the same surface, for the same surface pair. If it's too close, we skip it.
- This is another important performance optimization.
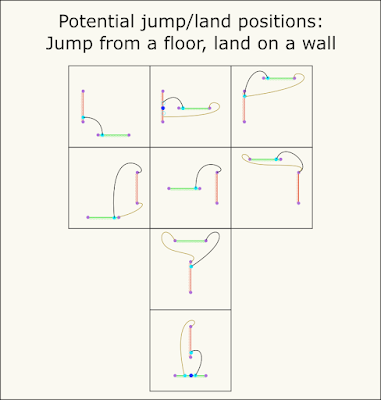
Unfortunately, most jump/land position calculations are highly dependent on the types and spatial arrangement of the two surfaces. There are many possible combinations, and most of these combinations must be considered individually. The following diagrams illustrate the many different jump/land combinations.
Calculating the start velocity for a jump
- [Source code]
- In the general case, we can't know at build-time what direction along a surface the character will be moving from when they need to start a jump.
- Unfortunately, using start velocity x values of zero for all jump edges tends to produce very unnatural composite trajectories (similar to using perpendicular Manhattan-distance routes instead of more diagonal routes).
- So we can assume that for surface-end jump-off positions, we'll be approaching the jump-off point from the center of the edge.
- And for most edges we should have enough run-up distance in order to hit max horizontal speed before reaching the jump-off point—since horizontal acceleration is relatively quick.
- Also, we only ever consider velocity-start values of zero or max horizontal speed. Since the horizontal acceleration is quick, most jumps at run time shouldn't need some medium-speed. And even if they did, we can force the initial velocity of the jump to match expected velocity, so the jump trajectory should proceed as expected, and any sudden change in velocity at the jump start should be acceptably small.
 |
| The trajectory starting with zero horizontal speed can't reach the destination. |
 |
| The trajectory starting with max horizontal speed can't reach the destination without colliding with the intermediate surface. |
Calculating the total jump duration (and the vertical step for the edge)
- [Source code]
- At the start of each edge-calculation traversal, we calculate the minimum total time needed to reach the destination.
- If the destination is above the origin, this might be the time needed to rise that far in the jump.
- If the destination is below the origin, this might be the time needed to fall that far—still taking into account any initial upward jump-off velocity.
- If the destination is far away horizontally, this might be the time needed to move that far horizontally—taking into account the horizontal movement acceleration and max speed.
- The greatest of these three possibilities is the minimum required total duration of the jump.
- The minimum peak jump height can be determined from this total duration.
- All of this takes into account our mechanics for variable-height-jump and slow-ascent-vs-fast-fall-gravity.
- With our variable-height jump mechanic, there is a greater acceleration of gravity when the character either is moving downward or has released the jump button.
- If the character releases the jump button before reaching the maximum peak of the jump, then their current velocity will continue pushing them upward, but with the new stronger gravity.
- To determine the duration to the jump peak height in this scenario, we first construct two instances of one of the basic equations of motion—one for the former part of the ascent, with the slow-ascent gravity, and one for the latter part of the ascent, with the fast-fall gravity. We then use algebra to substitute the equations and solve for the duration.
 |
| Jump height determines duration. |
- These trajectories both have the same jump height and take the same amount of time to rise and fall.
 |
| Different cases for determining jump height. |
- For the middle arrow, we can just calculate how long it would take horizontal motion to reach that far.
- For the upper arrow, we need to account for additional time to jump higher up.
- For the lower arrow, we need to account for additional time to fall further downward.
Calculating the horizontal steps in an edge
- [Source code]
- If we decide that a surface could be within reach, we then check for possible collisions between the origin and destination.
- To do this, we simulate frame-by-frame motion using the same physics timestep and the same movement updates that would be used when running the game normally.
- We then check for any collisions between each frame.
- If we detect a collision, we define two possible "waypoints"—one for each end of the collided surface.
- In order to make it around this intermediate surface, we know the character must pass around one of the ends of this surface.
- These waypoints represent the minimum required deviation from the character's original path.
- We then recursively check whether the character could move to and from each of the waypoints.
- We keep the original vertical step and overall duration the same.
- We can use that to calculate the time and vertical state that must be used for the waypoint.
- Then we only really consider whether the horizontal movement could be valid within the the given time limit.
- If so, we concatenate and return the horizontal steps required to reach the waypoint from the original starting position and the horizontal steps required to reach the original destination from the waypoint.
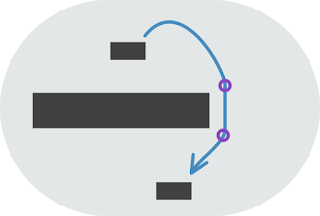 |
| Multiple horizontal steps. |
- This trajectory moves through a couple waypoints to maneuver around intermediate surfaces.
- There are three horizontal steps in the movement calculation in this case; they are joined together at the waypoints.
Backtracking to consider a higher max jump height
- [Source code]
- Sometimes, a waypoint may be out of reach when we're calculating horizontal steps, given the current step's starting position and velocity.
- However, maybe the waypoint could be within reach, if we had originally jumped a little higher.
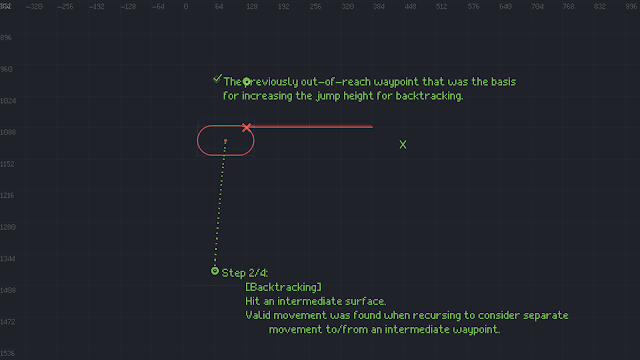
- To account for this, we backtrack to the start of the overall movement traversal and consider whether a higher jump could reach the waypoint.
- The destination waypoint is first updated to support a new jump height that would allow for a previously-out-of-reach intermediate waypoint to also be reached.
- Then all steps are re-calculated from the start of the movement, while considering the new destination state.
- If it could, we return that result instead.
 |
| Backtracking on jump height. |
- The naïve trajectory calculation (in red) couldn't reach the destination due to an intermediate collision.
- In order to reach the destination, the trajectory needs to maneuver through the waypoint (in purple), around the intermediate surfaces.
- However, with the original jump height, the movement cannot reach the destination after deviating through the intermediate waypoint.
- With an increased jump height, we can calculate a valid trajectory (in blue).
Waypoint calculations
- [Source code]
- We calculate waypoints before steps.
- We calculate a lot of state to store on them, and then depend on this state during step calculation.
- Some of this state includes:
- The time for passing through the waypoint—corresponding to the overall jump height and edge duration.
- The horizontal direction of movement through the waypoint—according to the direction of travel from the previous waypoint or according to the direction of the surface.
- The min and max possible x-velocity when the movement passes through this waypoint.
- With a higher speed through a waypoint, we could reach further for the next waypoint, or we could be stuck overshooting the next waypoint.
- So it's useful to calculate the range of possible horizontal velocities through a waypoint.
- The actual x-velocity for movement through the waypoint is calculated later when calculating the corresponding movement step.
- We typically try to use an x-velocity that will minimize speed through the waypoint, while still satisfying the horizontal step displacement and the waypoint's min/max limitations.
- Here's the sequence of events for waypoint calculations:
- Start by calculating origin and destination waypoints.
- For the origin waypoint, min, max, and actual x-velocity are all zero.
- For the destination waypoint, min and max are assigned according to how acceleration can be applied during the step (e.g., at the start or at the end of the interval).
- Then, during step calculation traversal, when a new intermediate waypoint is created, its min and max x-velocity are assigned according to both the min and max x-velocity of the following waypoint and the actual displacement and duration of the step from the new waypoint to the next waypoint.
- Intermediate waypoints are calculated with pre-order tree traversal.
- This poses a small problem:
- The calculation of a waypoint depends on the accuracy of the min/max x-velocity of it's next waypoint.
- However, the min/max x-velocity of the next waypoint could need to be updated if it in turn has a new next waypoint later on.
- Additionally, a new waypoint could be created later on that would become the new next waypoint instead of the old next waypoint.
- To ameliorate this problem, every time a new waypoint is created, we update its immediate neighbor waypoints.
- These updates do not solve all cases, since we may in turn need to update the min/max x-velocities and movement sign for all other waypoints. And these updates could then result in the addition/removal of other intermediate waypoints. But we have found that these two updates are enough for most cases. If we detect that a neighbor waypoint would be invalidated during an update, we abandon the edge calculation, which could result in a false-negative result.
- Steps are calculated with in-order tree traversal (i.e., in the same order they'd be executed when moving from origin to destination).
"Fake" waypoints
- When calculating steps to navigate around a collision with a ceiling or floor surface, sometimes one of the two possible waypoints is what we call "fake".
- A fake waypoint corresponds to the left side of the floor/ceiling surface when movement from the previous waypoint is rightward—or to the right side when movement is leftward.
- In this case, movement will need to go around both the floor/ceiling as well as its adjacent wall surface.
- The final movement trajectory should not end-up moving through the fake waypoint.
- The actual waypoint that the final movement should move through, is instead the "real" waypoint that corresponds to the far edge of this adjacent wall surface.
- So, when we find a fake waypoint, we immediately replace it with its adjacent real waypoint.
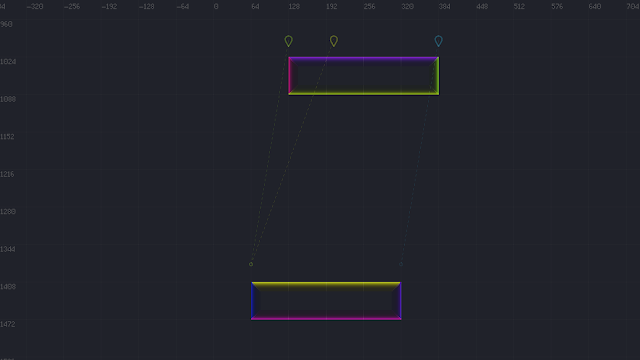
- Example scenario:
- (The following section illustrates this example.)
- Origin is waypoint #0, Destination is waypoint #3
- Assume we are jumping from a low-left platform to a high-right platform, and there is an intermediate block in the way.
- Our first step attempt hits the underside of the block, so we try waypoints on either side.
- After trying the left-hand waypoint (#1), we then hit the left side of the block. So we then try a top-side waypoint (#2).
- (Bottom-side fails the surface-already-encountered check).
- After going through this new left-side (right-wall), top-side waypoint (#2), we can successfully reach the destination.
- With the resulting scenario, we shouldn't actually move through both of the intermediate waypoints (#1 and #2). We should should instead skip the first intermediate waypoint (#1) and go straight from the origin to the second intermediate waypoint (#2).
An illustrated example of edge calculation with backtracking
The resulting edge
- This shows the final edge jump trajectory that we are calculating.
- We're jumping from the lower floor surface to the upper floor surface.
- And we're moving around the upper wall surface.
Step 1
- This shows that when we consider naïve horizontal motion, we hit the lower-side of the platform.
- This means that we will need to go through a waypoint around either side of the platform.
- However, with the original jump height we were considering, we couldn't reach either waypoint.
- So we will need to backtrack and consider a greater jump height.
Step 2
- This shows that we have backtracked in our calculations in order to consider a higher jump height.
- We are still colliding with the underside of the platform, but now we can reach one of the waypoints around the platform.
Step 3
- This shows that we can successfully move from the origin to the waypoint.
- This means that we didn't collide with anything else on the way there.
- Also, this mentions that this calculation involved a "fake" waypoint (outside the lower-left corner), and we replaced this with a "real" waypoint (outside the upper-left corner), since we didn't actually want to move through the lower-left-corner waypoint.
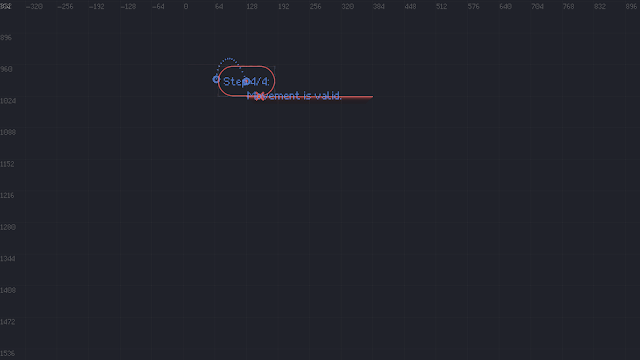
Step 4
- This shows that we can successfully move from our waypoint to the original destination.
- Now we can create the final edge trajectory by simply concatenating the parts leading to and from this intermediate waypoint.
Collision calculation madness
Warning: Be careful trying this at home! Godot's collision-detection engine has some rough edges.
At one point, I tried digging into Godot's collision logic in order to better understand some strange behaviors... But I quickly went back to trial-and-error analysis.
Here's a direct quote from a comment in Godot's underlying collision-calculation logic [source]:
give me back regular physics engine logicthis is madnessand most people using this function will thinkwhat it does is simpler than using physicsthis took about a week to get right..but is it right? who knows at this point..
From a lot of poking around, I have compiled a list of some of the quirks I've seen. Some of these limitations and rough edges include:
- When a KinematicBody2D is sliding around a corner of another collidable, Godot can sometimes calculate the wrong results (opposite direction) for the collision normal, which can lead you to believe the character is colliding with the opposite-side wall.
- This error might stem from an assumption that the direction of motion won't be in the same direction as the surface normal, which is unusual, but happens in this case.
- Similarly, Godot can also sometimes report two collisions instead of one, when the character is actually only colliding with a single merged surface at the point between two tiles.
- In this case, Godot thinks that the character is colliding with a false interior surface.
- Inconsistency between the behavior of the KinematicBody2D and Physics2DDirectSpaceState collision APIs.
- We originally used Godot's Physics2DDirectSpaceState collision APIs when pre-calculating edge trajectories. But that led to a surprising number of inconsistencies with reality. This is because the normal runtime collision system uses the KinematicBody2D collision APIs. You would hope that the two collision APIs give the same results, but they definitely do not!
 |
| Edge trajectories between floor and wall surfaces. |
Next: The platform graph and navigation →







Comments
Post a Comment