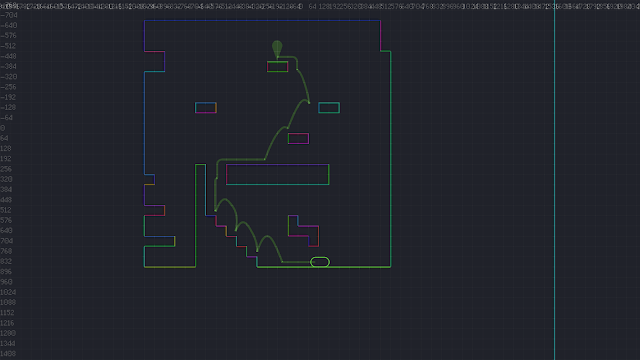
| Surfaces, edge trajectories, and a path through the graph. |
This is part 4 of 5 in a series describing how to implement 2D-platformer AI, pathfinding, and character movement. You can see a working example of these techniques in the Surfacer framework for Godot.
Part 4: The platform graph and navigation
Now that we've learned how to calculate the surfaces and potential jump trajectories for a given level and character, we can construct a platform graph and then use this for navigating!
The platform graph: Pre-parsing the world
 |
|
Nodes
The nodes in a graph correspond to specific positions along distinct surfaces.
- A single surface can contain many different nodes, each corresponding to edges onto or away from the surface.
- We covered how these surfaces are parsed in an earlier post.
- We covered how we choose specific jump/land positions along these surfaces in the previous post.
Edges
The edges in a graph correspond to movement from one position to another.
- An edge is directional, since the character may be able to move from A to B but not from B to A.
- There are many different types of edges, each corresponding to different types of movement.
- For example, a jump-from-surface edge, a fall-from-floor edge, or a climb-to-adjacent-surface edge.
- There could be multiple edges between a single pair of nodes or surfaces, since there could be multiple jump/land positions and multiple types of movement that could get the character from the one surface to the other.
- The jump/fall-based edges will make use of the trajectory calculations we covered in the previous post.
- Calculating a fall trajectory is a simple modification from calculating a jump trajectory.
- It just uses a different start velocity, and doesn't include a slow-rise-gravity component in the vertical step.
- Some of the important pieces of information for an edge are:
- The start and end positions.
- Which surfaces the start and end positions lie along.
- The duration.
- The start and end velocity.
- The trajectory—i.e., the character's position during each frame for the duration of the edge.
- The sequence and timing of corresponding controller input presses and releases that would produce the movement of the jump.
Don't store trajectory state!
This is important, since instruction state takes very little storage space, but trajectory state takes a great deal of space!
Intra-surface edges
We don't store intra-surface edges in the platform graphs, but they are calculated on-demand when searching for a path through the graph.
- These correspond to walking/climbing along the surface from a previous land position to an upcoming jump position (without moving to a different surface).
- These edges are straight-forward and cheap to calculate on-demand.
Multiple platform graphs per level
Since each type of character might have different movement parameters (such as jump height and walk speed), we need to calculate a separate platform graph for each character type. And we of course need to calculate a separate platform graph for each level.
Pre-calculating platform graphs
[Source code]We need to pre-calculate the platform graphs for a level before starting gameplay in the level.
- We could pre-calculate the platform graphs on-demand when the player clicks to start the level.
- The player would then have to wait for the level to load, and watch a progress-bar complete.
- Or we could pre-calculate the platform graphs ahead-of-time, as a separate build step, and store them in separate files, which we then load at runtime.
- We would then need to ensure that we also update the corresponding platform-graph file whenever we edit a level.
 |
| Platform graphs must be calculated ahead of time. |
Mostly immutable
[Source code]We typically treat levels and graphs as immutable, since any small change for adding or removing a surface could require recalculating large amounts of a platform graph.
But we can define a set of excluded surfaces.
- Edges to and from an excluded surface are still calculated and stored in the graph.
- But we can ignore an excluded surface during runtime searches through the graph.
- This gives us some ability to dynamically add and remove specific parts of the graph.
Traversing the graph
[Source code]We can use A* search to find paths through the graph.
- We can use either distance or duration as the edge weights.
- We can also give extra weight for different types of edges or surfaces in order to elicit different movement characteristics.
- For example, we could configure a character to be able to walk/climb along surfaces, but much more likely to jump when possible.
- We dynamically calculate and include intra-surface edges in the path result as part of our A* search.
 |
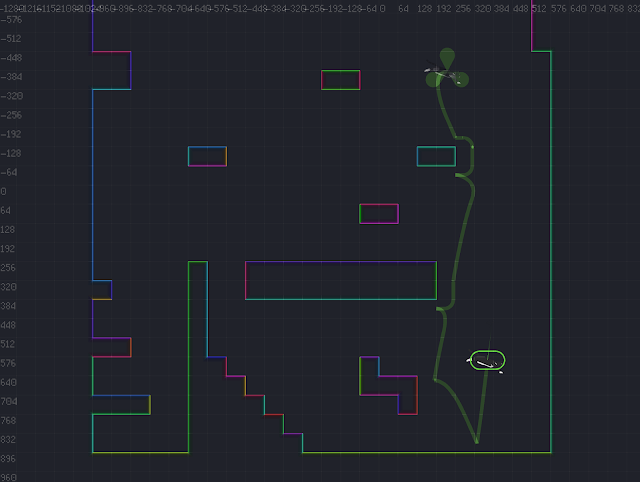
| The surfaces and inter-surface edges in a platform graph. |
Navigation: Using the platform graph to move from A to B
Once the platform graph has been parsed, finding and moving along a path through the graph is relatively straight-forward.
The main sequence of events looks like the following:
- Define a target point to navigate towards [source code].
- Find the closest position along the closest surface to the target point [source code].
- Use A* search to find a path through the graph from the character's current position to the destination position-along-a-surface [source code].
- Execute playback of the instruction set for each sequential edge of the path [source code].
 |
| The green character is controlled by player clicks. The orange character is controlled by AI behaviors (which we'll cover in the next post!). |
Dynamic edge optimization according to runtime approach
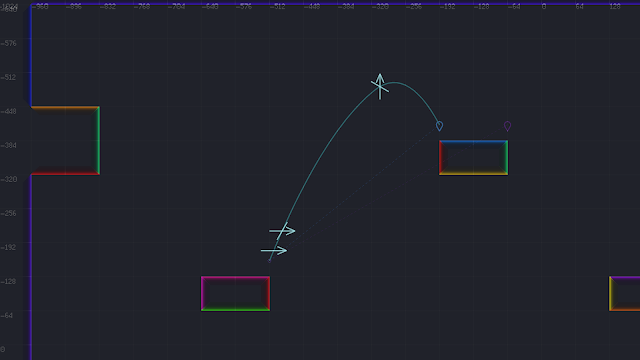
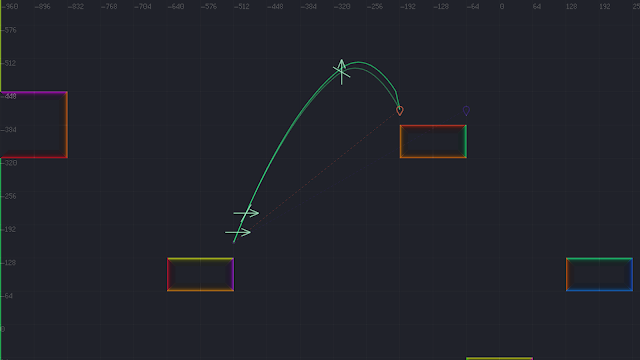
At runtime, after finding a path through build-time-calculated edges, we try to optimize the jump-off points of the edges to better account for the direction that the character will be approaching the edge from.
- This produces more efficient and natural movement.
- The build-time-calculated edge state would only use surface end-points or closest points.
- We also take this opportunity to update start velocities to exactly match what is allowed from the ramp-up distance along the edge, rather than either the fixed zero or max-speed value used for the build-time-calculated edge state.
 |
| An unoptimized path. |
 |
| An optimized path. Notice how the jump-off points from the upper floor surfaces produce less-perpendicular angles. |
Edge instructions playback
When we initially calculate the edges, we also store the sequence of instructions that would produce the edge's movement.
Each instruction defines the following:
- An ID for the relevant input key
- Whether the key is being pressed or released.
- The time.
The character movement system can then handle these input key events in the same way as actual player-triggered input key events.
 |
| Instruction input corresponding to the jump trajectory. |
- An arrow represents a key-down event.
- An arrow with a slash represents a key-up event.
- The initial jump-down input for a jump isn't shown explicitly.
- So, from start to end, the instructions for this jump trajectory are:
- jump-down
- right-down
- right-up
- jump-up
Correcting for runtime vs build-time trajectory discrepancies
When executing edge instructions, the resulting runtime trajectory is usually slightly off from the expected trajectory that was pre-calculated when creating the edge. This variance is usually pretty minor, but, just in case, a given character can be configured to use the exact pre-calculated edge trajectory rather than the runtime version.
Theoretically, we should be able to fix our calculations and eliminate this discrepancy, but it's difficult to get these things just right.
 |
| Runtime movement differs slightly from what we calculate at build-time. |
- The slightly-more-grey lower arc represents "continuous" movement.
- These are frame-by-frame positions that were calculated according to classic one-dimensional equations of motion for constant acceleration that look at the expected state for the current time relative to the overall start of the jump.
- These represent more-accurate and more-predictable movement according to our physics rules.
- With this approach, any position-calculation errors stay insignificant over time.
- We use this trajectory for correcting character positions at runtime.
- The slightly-more-colorful upper arc represents "discrete" movement.
- These are frame-by-frame positions that were calculated according to isolated acceleration/velocity/position updates that are just relative to the state from previous frame.
- These better represent the movement that would actually happen at runtime, since runtime movement is only based off discrete updates to the state left from the previous frame.
- With this approach, position-calculation errors tends to become gradually larger over time.
- You can see at the end of the arc that there is an abrupt cusp near the end-point, since the trajectory didn't line-up perfectly with the expected destination.
Dynamic edge calculation for in-air origins or destinations
We only store surface-to-surface edges in our platform graph, since it wouldn't make sense to try to account for all possible in-air end points ahead of time.
But it is easy to calculate an edge to or from a specific in-air position and include this in our navigation as needed.
 |
| Starting and ending at in-air positions. |


Comments
Post a Comment